Craft With Cutters Challenge #138 - All About Dear 'ole Dad!


Hello everyone!! I'm here today to share a simple calendar page with you and all of my friends over at CRAFT WITH CUTTERS !  I'm revisiting this project to share it with my new followers - You may remember that I did it last year as one of my regular blog posts.

If you have seen any of my previous posts, you probably know that I do a different calendar page each month to showcase on my fridge and then add it to my scrapbook in front of all the pics I took that month.  This month, I decided to show how you can make a calendar grid if you don't have the Designer's Calendar cartridge.  Here is my finished page:

Let's break it down a bit.

To make my grid, I used my Gypsy, (forgot to take a pic of my screen), and lined up 35 - 1.5"squares to form my calendar. The squares I used are from Art Philosophy because I wanted squares with a little scallop on the corners but any square will work.  After the cut, I trimmed the extra off the edges.
The 35 little squares can be saved for another project.

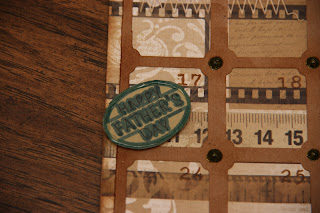
Then I used the Father's Day seasonal cartridge and my Cricut markers to make my icon to designate Father's Day on my calendar. I chose to just use the markers and not cut it.  I just cut around the outside with my scissors.

I then traced over the sentiment with my black gel pen.

Then, I actually used 4 of those little squares to stamp my title on - I used the Urban Alphabet stamp set from CTMH.  Then I used CTMH's Liquid Glass to give the letters a shiny appearance.
I punched holes in the squares and threaded twine through to hang then across the page. The squares themselves are mounted with pop dots so they won't slide around.
Here are a few more close-ups of the squares and the twine "clothesline".


I also used Liquid Glass to adhere the twine to the page.

I added Distress Stickles throughout the grid to give a little pop of color.

Here is the Father's Day icon in place.

The background paper is from DVWV's Heirloom stack - (I love this stack!)
One more look:


Thanks for stopping by today! I hope you enjoyed today's post! Remember to stop over at CRAFT WITH CUTTERS to see some more fantastic projects that celebrate DAD!
Now, go create something beautiful!!


Comments

Charlotte C said…
Such a great idea to create a calendar page for your scrapbook. TFS.
Thank you for the wonderful reminder.... I did this a few years back and it was wonderful for my scrapbook.... shame on me for not doing this anymore and thank you for inspiring me to get moving!
Sandy Palmer said…
LOVE the calendar page! Wonderful job on it! :)
Love this project and the very cool vintage feel. The banner title is awesome.
Larelyn said…
Wonderful idea and great project.
Hugs,
Larelyn
Clare Bray said…
Hello mate great bblog

Popular posts from this blog

Be My Valentine Blog Hop

Hello everyone and welcome to the "Be My Valentine" blog hop!! This is the first blog hop that I have had the opportunity to participate in and I've had so much fun!   If you arrived here from  Macy Bella Designs  then you're on the right track. If not or if you have missed a few blogs along the way, be sure to go to the beginning at  Creations With Kathryn  so you can see all of the great Valentine projects today!! There are even some blogs that have blog candy - (like ME!)  After you check out my project, your next stop will be  Crafty Baskets  . Now, on to my project!! I made a box to put a set of Valentine's cards in. I used a 12x12 piece of double-sided cardstock from K and Co. The cards are made with Kraft paper and are a 4x4 size. I used the Cricut Sentimentals cartridge for the postage stamp cut on the front of each card and used my Gypsy to cut them so I could unlink the H and W so it would be 3.75" square. The valentine cuts for the front of the ca

Think Spring Blog Hop

                                Welcome to the THINK SPRING BLOG HOP!!  You should have arrived here from the amazingly talented  Crafty Baskets  !  If you just happened upon my blog, be sure to go back to the beginning at  Creations With Kathryn  . She is our wonderful host for this hop!  On to my project: I decided to make a Spring mini album to showcase a few pictures that I took at the Zilker Botanical Gardens in Austin, TX.  What is more telling of Spring than flowers?!   I used the Card/Tag feature on the Paisley Cricut cartridge and used paper from the DCWV Spring cardstack. (I think this stack was from last year or maybe even the year before! :-) I'm just finally using it! )  The paper flowers throughout are from the 3 Birds Pretty Petals collection.  Read to the end of this post to find the link for the next blog to hop to and for my blog candy! This is a pic of an open page. Now for my blog candy!!  Just leave me a comment on this post with a way to contact you -

Long time no post! :-)

Hello everyone! I took some time today to update my blog and freshen it up a little! I've added current shopping links for my various businesses and ventures and they are in the sidebar so check them out to see lots of great products! I will be posting some seasonal projects very soon and I am hoping to offer some of them in kit form to provide the option of recreating these projects in your own craft room! Stay tuned! For now, check out some crafty inspiration at  Close To My Heart and I'll be back soon to show you new items for some sensational seasonal crafting!